One-Piece To Bikini Bottom DIY + How To Pick Cheap Matching Bikini Bottoms


   I wanted to share my small swimwear DIY, and then talk about picking cheap bikini bottoms for your pricier bra-sized bikini tops. But before that, a quick reminder: have you entered the Ruby jewellery give-away yet? I'll be picking six winners, any maybe you'll be one of the lucky ones who gets to pick one of seven different beautiful pieces!

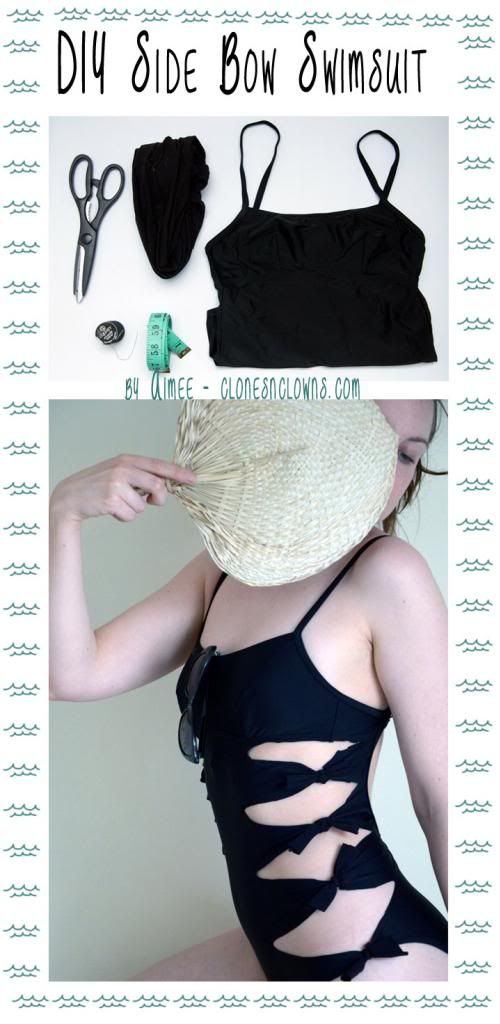
   I own an older bikini set from Ewa Michalak. I love it to bits, but always wish the bottom was higher-cut. When my Freya Soda one-piece stopped fitting me in the cups, I realised it was the exact same shade of red as the Ewa Michalak suit. So I decided to refashion it into a high-waisted bikini bottom.


   I cut off the bottom part, so that the bottoms would end an inch or so below the navel. Then I folded the top over once and sewed it with a zig-zag stitch (which is elastic). It is important to use a jersey needle on the machine, so as not to poke large holes into the fabric (the jersey needle sort of slips in between the threads instead of cutting though them). Because this suit has a lot of lycra, I didn't use an elastic, but you might want to if the bottoms fall off.


   I also scrunched the bottoms on the back, because I find the look extremely flattering. Just watch out: this makes the bottoms quite low-cut at the back (if you scrunch all the way). I was lazy and simply pulled a thread through, but then the scrunch was very uneven. So I did a backstitch by hand to keep the folds in place. But my seamstress friend told me the right way would be like this, this would make the scrunch stable and stretchy.


   My point here is that it is already hard enough to buy bikini tops in your bra size, in a style that works for your breast shape and appeal to your aesthetic sense. And very often the matching bottom is in the wrong style, or simply quite pricey. An alternative can be buying a cheaper piece that goes with your top, or even hacking off a one-piece.

How to pick a matching bikini bottom:

   It is not easy to find a bottom in exactly the same shade as your top. However it is also hard to make a bottom in a different colour and style look deliberate. Black bottoms go with most tops. Also versatile are bottoms that look like denim, because in most people's eyes denim is a neutral and goes with almost everything. If your top has a pattern, you can pick any of the colours from the pattern and get a solid bottom in that colour (and vice-versa, if you are getting a patterned bottom to a solid top.).
   If you choose a bottom in a different colour and you have a hard time seeing which colours go together and which don't, these simple rules might help you out.
    You can also add elements to tie both pieces together, for example buy cute buttons in exactly the same colour as the bikini top and sew them onto the bottom.
    I really suggest looking for matching bottoms in brick-and-mortar stores as opposed to online, since it is really difficult to match the exact shade through a monitor.

   Over to you: do you mix and match bikinis? What is your favourite bikini in your bra size?


The Unexpected Effects Of Staying Fit


The Surprising Effects Of Staying Fit


   You have probably gathered from past posts that I have been working out regularly in the past couple of months. Vanity and health were my main motivations (in that order), I wanted to lose body fat and have more energy and endurance. The first three days were hard (everything gets better after three days), and after that I started enjoying my time at the gym. My goals shifted, and I suddenly realised that being active had surprising benefits:

* I can dance all night long. When I went dancing with friends, they had to take pauses to rest, while I could move non-stop. It was morning when my feet started getting tired.

* Firmer everything. Firmness is the first effect I noticed: everything feels lifted, harder.

* I'm stronger. And it feels great.

* I'm feeling more comfortable in my body. Working out gives me a serious boost in the self-image department. And I mean the actual exercise, not the effects.

* My bike got a lot lighter. I have to store it in the cellar, and carrying it up the stairs suddenly got a lot easier.

* Shift in body-related goals and wishes. Suddenly what my body can do has become as important as what it looks like. I also love looking at people who can do cool stuff with their bodies.

* Shift in body appreciation. I appreciate stronger, more muscular bodies more than I used to. Because those bodies can do awesome stuff.

* No winter blues. I have stopped taking my St. John's Wort supplement a long time back because I didn't need it any more. And I have been feeling really well. Granted it´s been a mild winter, but still.


   Just to clarify: I was always getting some movement, for example I walk a lot since I don't own a car. However it's the more intensive kind where my heartbeat rises and I break out into sweat that does the magic. I really want to make this a habit, a non-negotiable part of my lifestyle.

  Over to you: what is your favourite effect of staying active?


Cosmetic Favourites January 2014: Catrice Camouflage, Shoenberger Shampoo, Catrice Magic Lipstick, Kajal,


  Hello everyone, in the last weeks I have been testing several new products. Here are the ones that impressed me the most:


Catrice Ultimate Lip Glow

  Magic Lipstick: one colour fits all -- you have probably seen this gimmicky product in the 90s. They seem to be getting popular again, as this one from Catrice is not the only one I spotted on cosmetic shelves. It changes according to your lip colour and it's a great product if you have a hard time figuring out which colours suit you. On me this one from Catrice turns into the pinkest shade that still looks good on my warm complexion.


Catrice Camouflage Cream

   The best concealer I have found so far. It covers really well, and only a very little bit is enough to cover dark circles and discolourations. In fact the concealer is rather thick and heavy, so you have to apply just a thin layer to make it look natural. Also excellent for spot-concealing on very small areas (I use a lip brush for that). The best thing about is that it doesn't settle into the lines in the under-eye area. It is very easy to apply and blend with the fingers or with a brush. I use the 02 for my face, and want to buy the 01 for the under-eye area.


P2 Impressive Gel Kajal in Dramatic Brown

   This Kajal is soft and very easy to apply, you get quite clearly defined lines. It can be blended and smudged very nicely. Once it dries it doesn't smudge and stays in place all day. The colour is chocolate, very slightly on the warm side but practically neutral (unless your skin tone is really cool).


Schoenberger Shampoo Bio Granatapfel

   If you do need a shampoo with sulfates from time to time, this is a nice and gentle one. It cleanses the hair well without drying it out, and leaves the hair soft and moisturised I use it on my scalp and not on the ends, since I use the conditioner-shampoo-conditioner method. Since it contains sulphates, I use once every week or two for a more thorough cleansing. The shampoo is BDIH certified organic.


M.Magi Flash Flash Instant Manicure

   I picked this up at a spa day, it was love at first try. It is a mixture of oils, sea salt and pulverised precious stones that moisturises and exfoliates your hands. You rub it all over your hands, wash off with just water and towel-dry. It leaves my hands so amazingly smooth that I checked four times to make sure that there aren't silicones in there. But nope, it's just plant oils. At 10€ it's rather pricey, so I plan to do a DIY version once I've finished up the bottle.


  Over to you: which cosmetic products have impressed you this spring?


DIYing an, Refashioning And Embellishing Your Swimwear -- A Tutorial Roundup


tutorial here


   If you live on the northern hemisphere, swimsuit season is around the corner! As it can often be pretty hard to find a suit that you like in your bra size, I wanted to show you a couple of ideas on how to alter pieces to your liking. If you wear a size that is hard to shop for, you could buy a simple piece in a colour that you like, and alter or embellish it to fit your style.

   It all started with my red Ewa Michalak bikini. I love the top, it is amazingly flattering and supportive. However I always wished the bottom were not so low-cut. When the Freya Soda stopped fitting me in the cups, I realised that it was the exact shade of red as the EM. I ended up cutting it up to turn the lower part into a bikini bottom. I will post photos when I'm done, as I need access to a sewing machine to finish it.

   Transforming swimsuit pieces can be as simple as adding a couple of embellishments to a basic piece, or a bit harder like turning a one-piece into a two-piece or vice-versa. Interestingly, swimsuit fabric isn't that difficult to work with, since it doesn't fray. Just remember to use a zig-zag stitch if using a sewing machine (to keep things stretchy), and to use a synthetic thread (they are much stronger and resist chlorinated water).

   When I was looking for tutorials on reconstructing swimwear, I found many great ones that I want to share with you. I hope that they will inspire you to customise your own swimwear.

My favourite swimsuit hacks:

Embellishing:

Add ruffles (another variation),
Scallop the bottoms,
A simple cut-out or a woven slash,
Another cutout,
Side knots,
Scallop 
Add beads to straps (also works for plain fabrics)
Add beads all over
Add a fabric braid

   Other ideas that I did not find tutorials for, but should be easy: painting with fabric colours or fabric felt-tip pens, glueing on embellishments, adding studs, sewing on buttons or beads.


Modifying and reconstructing swimwear

Sewing a sports bra into an unsupportive swimsuit.
Adding straps to a strapless piece
One-piece to bikini
One-piece to tankini
Retro high-waisted bottoms from a one-piece
Bikini to lacy one-piece


   And my absolute fave: a super-easy way to make your bikini bottoms a thousand times more flattering:


  I hope that these lovely tutorials motivate you to customise your swim wear. If you have never sewn anything before, you could use a cheap piece to practice one. Here is to staying stylish and supported this summer!

   Have you ever tried to alter a swimwear item? Do let me know in the comments, and if you have documented it do link to the photos. I'd love to see!


Let's Do Something About Fracking + A Sparkly Giveway For You!


   I almost wanted to title this post "a frakking giveway" -- those of you who have seen Battlestar Galactica will know what I mean ;)

   Today I'd like to introduce you to Ruby, a boutique lingerie and handmade jewellery brand based in Cape Town, South Africa that specialises in fashion-forward pieces with hand-crafted elements. Their pieces have been featured in magazines like Elle, Cosmo and Glamour. Many of their items are hand-beaded and finished by the Ruby Beading circle which gives career opportunities for rural, impoverished women with no marketable skills but their traditional beading techniques. As an independent, designer-owned brand, RUBY is in a unique position to leverage off their fashion-forward position, and utilise various media to draw attention to a number of issues that they feel are important for us, and our planet.

   Here is their latest Anti-Fracking "Count Fracula" Lingerie campaign, shot to create awareness about fracking. The South African government recently gave permission to Shell to start the exploration process for shale gas in areas of South Africa. If shale gas is found in large enough quantities oil companies like Shell want to start fracking, which will have a horrific effect on the water, environment and the lives of the people and animals in the region. RUBY's campaign not only grabs our attention with it's gorgeous lingerie but also, most importantly, aims to raise awareness about fracking:


   Now, this I can totally get behind: fashion and ecological issues.

  You have probably heard of fracking, but not everybody knows exactly what it is. Fracking is basically drilling very deep to get to deep oil and gas reserves, (very prettily explained here). The biggest problem with this is that harmful chemicals (the names of which oil and gas companies will not disclose to the public) are pumped into the earth during the process, which end up in the soil, the atmosphere through evaporation of waste-water (a by-product of fracking) and the groundwater. There is high risk of leaks, spills and contamination during all stages of the process. A test frack in the UK even caused an earthquake. This video shows what comes out from the taps in the kitchens of homes near areas where fracking takes place:


   These are the fracking-prone places, as of 2013. If fracking is allowed to boom, many more frackeable sites may be discovered and you might find a drill in your own backyard very soon.

Image from shalestuff


  The solutions? Develop renewable resources instead of drilling for more oil. The world needs to move away from gas and oil anyway, and it is absolutely doable. If Germany, a country with not much sunlight (its photovoltaic potential can be compared to Alaska), not much empty space and few rivers appropriate for generating hydropower, actually managed to get half of its energy from renewable resources last year; then every country can do it. The technology exists, there are so many incentives (environmental, health, decentralisation of the energy business). It's just that governments prefer to overlook the good of the average citizen and support huge corporations instead. Ridiculous subventions of oil have to be stopped. In Germany the government artificially raises the price of energy to motivate push people to make their home energy efficient (an average German house uses around half the energy that an average US house uses, even though many parts of the US have a warm climate and tons of sunlight while all German homes need to be heated several months per year).
  If you are interested in saying no to fracking, search online for petitions in your country. Sign them and pass them on to your friends. Hopefully you are living in a democracy, where voting "no" might just change something. The UK has this great site where you can find out if your home is at risk of being fracked. For the US, here is a handy map, and here is a petition to sign.

Ruby jewelry giveway

   Ruby's gorgeous lingerie and jewellery are available amongst others in their Etsy store. The pieces are surprisingly affordable! RUBY is are kindly giving away jewellery pieces to six lucky winners! You could win one of these beauties:


#1 24k Gold Plated handmade Heart Locket


#2 Copper plated Spirit Quartz Pendant


#3 Gold Geometric and Crystal Necklace 24k Gold


#4 Gold Dipped White Druzy Crystal Pendant


#5 Shark's Tooth Fossil Talisman Pendants


#6 Spirit Quartz Claw Pendant


#7 Upcycled French Franc Coin Heart


#8 Vikki Hoops


   My personal favourite is the Geometric Crystal Pendant, but a close second is the Spirit Quartz Claw because I love the juxtaposition of the rough and the shiny.

   You can enter the giveaway via the Rafflecopter form. Don't forget to mention in the comments how do you feel about fracking!

Rules:
* The giveway is open worldwide
* It will run till the 10th of April 2014
* Six winners will be chosen randomly and notified by email. Please check your spam folders, since almost each time I run a giveway some of the emails that notify the winners never get found.


RUBY images by Gavin Goodman


VAT Tax On International Bra Orders: Are You Paying It Twice?


   If you have been buying bras (or anything else) from abroad, you might want to know what VAT is, whether it's included in the price of your bras, and whether you have to pay it or not. You might even be accidentally paying it twice! Also, a tip for those of you with a mastectomy.

So, how does VAT work? 

   VAT a tax on the purchase price. It is a tax meant for residents of that country, (or the whole EU). You pay VAT to the government of the country that you live in, so you do not pay VAT for an item that you order from another country. You will, however, have to pay import tax.
    If you are travelling internationally, you can often get VAT refunded. You need to keep the bills of the items you purchased and find out where to get a refund. I once remember my aunt waking up very sleepy customs officials at the airport at midnight to get back 50€ VAT for us.

According to Wikipedia:

"Nearly all countries that use VAT use special rules for imported and exported goods:
* All imported goods are charged VAT tax for their full price when they are sold for the first time
* All exported goods are exempted from any VAT payments"  
 So, how does this work when buying bras? Prices on most websites include VAT, which may be anywhere from 5% to 22%, depending on the country. Here are two scenarios. EU is used here just as an example, the examples apply to most countries.

Scenario #1: 
  You are buying bras from the EU, and you live in the EU. The VAT is included in the price of the bra, and you have to pay that full price.

Scenario #2:
   You are buying bras from the EU but you live outside the EU. The VAT should be deducted from the price of the bras. This is indisputable.
   What happens when the package arrives to your country depends on the tax laws of your country. Probably you will have to pick up the package at the customs office and pay the VAT of your country + customs for the bras. Or not. The VAT of your country is probably different from the VAT of the country where your bras came from.

You should not be paying VAT twice

   This was brought to my attention by a lovely Swiss reader who also happens to be a lawyer. She lives outside the EU, and had ordered a bra from a store within  the EU. The price of the bras included the VAT tax (20%), which she normally should not be paying since she is not an EU citizen. However the seller did not deduct the VAT, even though the bras were being exported outside the EU. Once the bras were in Switzerland, she had to pay import tax, plus the Swiss VAT (8%). Not fair!

How to navigate the VAT issue

  Unfortunately not many online stores pay attention to the VAT issue when selling internationally. The correct way would be to change the prices to the untaxed price on checkout for non-EU customers. However, it looks like nobody does that, although I have seen an ad of a clothing store offering "21% off for non-EU buyers", which strikes me as a very simple and elegant solution.

  Most online stores that I researched did not even mention VAT. Here is what I found out so far:

Ewa Michalak: will subtract VAT if reminded. Maybe remind them before you actually pay?
Bravissimo stated that "Although goods sent to addresses outside the EU are not subject to VAT, our customers pay the same prices across the world as this helps us to cover some of the additional costs of providing a service to international customers."
Debenhams likewise doesn't refund VAT: "All total prices for goods and services at the checkout represent the total price payable by the customer for those items, regardless of the address for delivery. For deliveries to the EU, this price includes VAT (or VAT equivalent) at the current rate. Although this price is the same for deliveries outside the EU, where VAT (or VAT equivalent) may not be applicable, customers are not entitled to any discount or refund to account for the differences in tax treatment and will pay the same price for the item as a customer placing an order for delivery to the EU. " 

VAT for mastectomy: 

   Apparently if you have had a mastectomy, you don't have to pay VAT.

So what is my advice? 

   I'd suggest writing to bra stores that you want to order from and asking about VAT refunds. There is nothing like customer pressure to change the policies of businesses.

   If anyone of you knows of bra stores that refund VAT, or simply have more precise information about VAT, do share in the comments!

   Big thanks to R. and to the amazing Perfectly Fitted Bra Bloggers (especially the ladies behind FussyBusty, DressingCurves and WideCurves for material for this post!


Going To France, Need Your Tips!


via Sodahead


   Hey everyone, I am finally going for a long overdue family holiday. I will spend a week or two around Marseilles, and I'm so excited! Even though I'm more of a backpacker+culture traveller, I still love to pick up a couple of cosmetic products when I'm abroad. I brought back saffron soaps and Hammam scrubbing gloves from Turkey, Joanna leave-in rinses and Kallos Latte from Poland. However always when I'm back home, I always find out about all the amazing stuff I could have gotten but didn't know about. So, I thought I would ask you for ideas, and later on collect them into a post which might be useful for travelling beauty addicts.
    What should I absolutely buy? Where can I get it? I like to spend up to 15€ for skin and hair products and up to 10€ for makeup, though I have been know to spend more for really good stuff. Also, does anyone know if Cattier is cheaper in France? I love their micellar cleanser and their clay masques, and would like to try their other products if they were a tad cheaper.
    Of course any other tips for Marseilles and around would be great! Where is the best chocolate? Any cute stores or whimsical cafes you recommend? Interesting day trips? What do I wear to not stand out to much?
  And, very important: what would a French person like to get as a gift from Germany?
   Also, does France have any good drugstore-chains, something like DM in Germany?
   A confession: I am terrified of the French language because I still cannot speak or understand the spoken version after learning it for three years.
   I'm looking forward to your tips!!


Matte, Shimmer And Glow: Which Makeup Finish Is Flattering For You?


    Today I want to talk about all the different finishes of cosmetic products, and give you tips about which is flattering for you. For personal purposes, I distinguish five grades from matte to glitter: matte, glow (satin), pearly, shimmer and glitter.

   The rule of repetition says that shimmer and sparkle in your makeup will flatter you if you have shine and sparkle anywhere else on you. Look for shine in your hair: is it more on the shiny side or on the matte side?
  A friend of mine has very shiny, very light blond hair, and she can rock shimmery eye-shadow during the day and make it look appropriate. For someone with very matte hair the same eyed shadow would look overly glittery.
 Whether the hair is shiny or not is determined by the hair's natural structure and its health. Healthy, non-damaged hair is always shinier than hair where the scales have been damaged by heat, harsh products and rough handling. Naturally blond hair as well as straight hair tends to be shinier. Non-shiny hair, (as long as it is healthy), usually has an interesting texture. Of course you can help your hair to shine more with diy lamination, or shine serums.
  Pay attention to your skin texture: if it is naturally dewy, don't overwhelm it with too much matte, that would just age it. If it tends to be oily and shine too much, you will need mattes but don't overdo it; also feel free to use shimmer on the eyes and lips. Matte skin (usually mature skin) will look more alive with small doses of a very subtle glow.
    Of course clothing with sparkle or shine also calls for makeup with a bit of shimmer. This is more of a dressy look that works well for the night. Artificial light so makes everything look flat, so you can pile on much more sheen and sparkle than for the day.


   Here is a small guide to matte and sparkly products. If you have shiny hair, you can use more shimmer that I suggest, if you are very matte stay on the matte side of things. Also, these tips are rules of thumb or rather loose guidelines. Feel free to ignore them if you are going for a specific look or know what you are doing.

Foundation:
  Totally matte foundation rarely looks on anyone, and can age the skin. In east Asia the dewy look is preferred, that's why you will find many BB creams in this finish. In the west, matte is more popular but it is still brightened up by a generous use of shimmery highlighter. I'd love to encourage you to try a non-matte foundation: it can really look fresh and youthful! One great way to do this is to apply a glowy foundation or primer below your usual foundation, for a very subtle but pretty glow.

Primers and bases (face and eyes):
   These are often glowy or lightly shimmery, which is a good solutions for those of you who need a very little bit of shimmer under an otherwise matte make-up.

Pressed powder:
   Used to mattify the complexion. Use this only for the oily bits (the T-zone). Stay away from the area around the outer eye corners, as it can make the lines in that area more visible.


Eye-shadow:
   Matte neutrals are amazing for the daytime no-make-up make-up look. Darker shades in matte can look very dramatic and latina-diva. However shimmer can brighten up the eye, especially at night. Here is a nice comparison. Baked eye-shadows have very fine pearly particles which give a wonderful look, as opposed to typical shimmery eye-shadow which is basically matte mixed with sparkly bits. Of course eye-shadow is also the place where you can really go wild with pure glitter for a night out.
   Baked eye-shadow offer a more metallic rather than glittery finish, and are really easy to use. Above is the eye make-up that I got at the Alverde ladies at DM's Beauty Camp. A more intense look can be achieved by shimmery mineral eyeshadow.


Lips:
   Shimmery bright lips are bold and dressy and hard to pull off for the day. They can look stunning at night, but they do look weird when they start coming off when you eat. Slightly shimmery lip products will make thinner lips look fuller. Very full lips should stick to matte or satin shades make lines show up, so adding a bit of gloss on top is  good solution.

Bronzer:
   If you want to contour your face or just sculpt your cheekbones with it, stick to the matte ones (slightly Dewar at most). Shadows do not shimmer. Shimmery bronzer works for tat sun-kissed effect: dust it where the sun would naturally hit your face (the tops of your cheekbones, across your forehead and down the bridge of your nose. Any more than that looks good only for that glam beach look (not sure where you would wear that though), or a festive occasion. Or used on dark skin as a highlighter.

Blush:
   Matte to dewy is appropriate for every occasion, and if applied lightly will look very natural. Bright shades are easier to pull of if they are matte. Pearly blush should be restricted to the tops of the cheeks, since it will function a bit like a highlighter.
   For all of the above products it is important how fine the glittery particles are: big sparkly bit can look cheap very easily, while very fine shimmer looks much more sophisticated. Also, don't do all over shimmer. Don't do shimmery blush + highlighter + shimmery bronzer. Don't do shimmery eyes and lips. Unless you really know what you are doing.

Note that the blush is matte (also from Alverde)
   I love highlighters, however it is the very subtle ones that give that "wow" effect. Stay away from anything with big sparkly bit. You are looking for a glow or pearly look for the day, for the night it can be even as bold as a subtle shimmer. My favourite highlighters are minerals. Here is an image from a review of Lumiere mineral highlighters I was going to do. The brand doesn't exist any more, but you should definitely check out online mineral makeup stores for highlighters in a variety of shades and finishes. Here are a couple of warmer and subtler highlighters that I use:


How I use shimmers and mattes in my makeup:

   My hair is rather on the matte side. I use Lumiere mineral makeup in a slightly dewy finish, and often use mineral foundation with a decidedly pearly finish as a highlighter. Because I have slightly hooded eyelids, I make sure the darker shades of eyeshadow that go on my crease are matte, but I love using a shimmery shade on the lids and below the brow. I am not a fan of very shimmery lipsticks, I think the only one I own is a frosted nude (image above) which works because the colour takes a back seat.

  So, what is the bottom line? The most universal finish is one that is slightly dewy (aka matte, but not too matte); followed by a very subtle shimmer. Another simple tip would be to apply shimmer to the part of your face that you want to draw attention to.
  And no, not all my stuff is from Alverde. My favourite highlighters are from Lumiere (but the brand doesn't exist anymore), and I love my nude eyeshadow palette from Zoeva as it contains a balance mix of mattes and shimmers.
    
  What about you? Do you prefer matte of shimmer, or rather: which products do you prefer to have a matte finish, and which ones a shimmery finish?


Weekend Reads 15-03-2014


IMAGE TITLE


Hello everyone! I hope you've al had a nice week. I'll keep it short today and go straight to the great links for this week:


* This lady does her own brazilian waxes at home, and tells you how.

* How to fit your shoes into your outfit

* If you own a smartphone, you might want to read this.Because of this I don't have the Facebook app, I access Facebook via the browser.

* I loved Housecleaning for artists, creatives, ADHD-ers and ENFPs!

* Seriously cute comics about introverts.

* Find the fish that live  in the very deep parts of the ocean fascinating, so I totally loved this TED talk.

* If you want good lighting at your makeup table, your home or your photography corner, you need to know your Kelvins.

* It seems that a lot of people don't seem to know that breasts can change shape according to the position you are sitting in, so this lady made this small demonstration (NSFW).

* Mesmerising (and sometimes hilarious) photographs of dancers. Going about their daily life... or not? The dude in the shower kills it. And no, this is not photoshop, dancers can really leap like this.


And finally, something to melt even the coldest, blackest hearts:


DIY Simple Aloe Vera Hair Rinse For Moisture And Shine


   Today I'd like to show you how to make a lot ridiculously simple super-moisturising hair rinse. I wrote a bit about rinses here, this is simply some kind of liquid which you use as the last rinse when you wash your hair (you don't wash out the rinse). Depending on the ingredients, rinses can give your hair volume, weight, shine, moisture, cut down frizz, lighten or darken the hair, and much more. Today I want to show you how to make a very simple rinse with aloe vera juice that will moisturise your hair. Aloe vera is super moisturising, plus it is acidic so it will close the hair cuticles which makes the hair shine. It also enhances the curl in curly and wavy hair.
  If you don't like the effect on the hair, you can always try adding the aloe vera juice to shampoo, conditioners, as a scalp treatment, face masques or drinking it.

You need: 

   Aloe vera juice. It should be as pure as possible, with no or almost no additives and conservants. You can usually get this at health shops or apothecaries. I get mine from the Norma, it's organic and affordable.
   Aloe vera gel contains thickening agents so it sill work differently (probably stiffening the hair), but you can try it if you don't have access to aloe vera juice. Of course you can also use fresh aloe vera, although I don't have any tips for extracting the gel (squeeze? soak? blend? no idea) -- if you do this please let me know how you did it and what the effects are.
   You also need water. If your water is very hard, you might want to boil it first (let it cool down) to get rid of the excess calcium. You can also use demineralised water (from a gas station) or distilled water.

How to:

   Add one part of aloe vera juice to two parts water.
   The rinse can make the hair slightly stiff, which is good new for those of you with hard-to-control hair. If you want to avoid the effect, add a dash of vinegar or lemon juice, or use less aloe, or rinse the hair afterwards.

How to use: 

   Wash and rinse hair as usual. Pour the hair rinse over your hair, alternatively you can also dip your hair into a bowl with the rinse. Towel dry.

How to tune the aloe vera hair rinse:

    I suggest you first try the simple water+aloe version a few times and see how your hair likes it. After that you can try to tune the rinse. Here are some ideas, though I'm sure you can come up with more:
* Use a herbal tea instead of water. Choose the herbs according to their properties.
* Add a few drops of essential oils for a nice scent.
* Add a few drops of a light oil to add more weight and cut down frizz. Mix very vigorously to mix the oil droplet with the water.
* Use panthenol, honey, hyaluronan or urea for even more moisture.
* Add a plant extract.
* Add a hydrolate.

   I'm sure you can think of more! However in my experience it is best to keep it simple. More definitely isn't better, and often a 2-3 ingredient product works best.

   Do let me know if you try this simple aloe-vera hair rinse. Also, do you use aloe vera in any other part of your beauty routine?


Review: Wiesmann Roxana Balconette in 65E


   Remember the beautiful Wiesmann bra that I reviewed a while back? It is still one of my favourite bras and the best soft-cup (wired but not padded) bra that I own. So when I recently realised that I own too many neutral bras that are either lined or moulded, I decided to treat myself to some Wiesmann.

   The fit of this red Roxana Balconette is exactly the same as that of the Tiffany, indeed it is exactly the same cut only in a different material. The cups run small. The cups give a very rounded shape, and looks like it has been custom-made for me; there is no wrinkling at all. The top edge of the cups lies flat on the breasts, neither cutting in nor standing away. The balcony shape is very flattering, both for small breasts and bigger ones.
  Another plus point is for the removable straps: though the bra cannot be worn as a strapless, the possibility to switch out the straps is quite practical.
    I had absolutely no issues with the underwires this time. My only complaint is that the material might be a bit scratchy for someone with sensitive skin. It's not the best quality mesh that I have seen. For more details and measurements, check out the review of the Wiesmann Tiffany balconette.

    I will just leave a couple of photos, before we can talk about where to buy Wiesmann bras:


  Shopping for Wiesmann bras

   The more "common" sizes of Wiesmann bras are easily available. Even Amazon and Ebay stores sells Wiesmann, and you might find other online stores if you google. I found Wiesmann bras in German online stores such as welt-der-dessous or ladys-dreams, but they usually cost more than what they cost in Poland. However, I had a very hard time finding band 65 (UK30). In the end I bought from Diores.pl which accepts Paypal, ships internationally for reasonable prices, and features models which look a tad, um, porny. The site is in Polish, but I think you can navigate is easily with Google translate.

   Here is review of another Wiesmann bra, namely the Wiesmann Maja balconette.

Did anyone of you try a Wiesmann bra? If yes, I'd love to know where you got it.


Why I´m Not A Fan Of IPL Hair Removal + Review Of Philips Lumea


   A while back I got the Philips Lumea Precision Hair Removal System to test for a couple of weeks, and I wanted to share my impressions with you.

   IPL means Intense Pulsed Light, a temporary hair removal technique that previously used to be done only in salons. The light destroys the hair follicle, and it takes a couple of weeks for it to regrow, depending on your hair type. IPL works best on someone with dark hair and a light skin tone, so if you have blond hair or dark skin this method is not for you.


   The Philips Lumea itself is well-designed and egronomic; it fits well in the hand, is light and easy to use. It looks a bit light a weapon from Star Trek. It is cordless, and the battery lasts a really long time -- I didn´t have to charge it the whole time I had it. The bulb is built-in and nor replaceable, and is meant to last 5 years.
   To use the Philips Lumea you first need to shave the area really well. You set the IPL intenstity between one and four. You then place the tip of the Lumea flat on the skin, and when the light glows you press the trigger. There is a bright flash, sometimes there is a slight smell of burned hair. I usually covered the head of the Lumea with the other hand because I found the flashes tiring for my eyes.Then you move on to the next patch of skin. The pain depends upon the setting. On 4 (the highest) it feels a bit as if someone just snapped a rubber band against the skin. On lower setting you feel almost nothing.
    You can repeat the sitting every two weeks, never more often otherwise you risk burning the skin. According to the manual you should not use the Lumea on the face.
   It usually takes around 6 sittings to be more or less hair-free, and then another couple of weeks till the hair starts regrowing again. It all depends upon your hair type. With fair skin and dark hair I am the perfect candidate for IPL; however my strong growth means that that I wasn't completely hair-free after 6 sittings, and the hair that was gone was growing back after around 4 weeks. During the time that the hair was gone, the effect was really nice.


   Now, though the tool is easy to use, I had my issues with it. First, it takes a very long time to do a larger area like a leg. You need to wait a bit after every flash till the tool "reloads" and is ready for the next shot. So basically only the bikini area and the armpits are small enough to make this method efficient. Secondly, I was always missing patches of hair. It is not always easy to remember which bit of skin you have already covered and which not, especially on a larger curved area like the legs. Only after a couple of weeks when the hair stopped regrowing in some placed and not others did I notice that I wan´t covering the whole area thoroughly.
   Another thing is that to use the IPL you need to shave. My preferred method of hair removal is epilating, which I do every one to two weeks, so shaving almost every day for a couple of weeks while I used the ILP was rather very annoying.
    Another issue is the sun: you have two wait at least 2 weeks after sun exposure to use the IPL. This would mean that I would not ebe able to use the IPL all summer long, and would probably epilate instead. Then in the autumn it would take a couple of weeks till the epilated hair grew back and could be IPLd, and IPL treatments for two months till I was hair free; and then I could squeeze out a couple of months use for the IPL till the summer came.
    Finally, the Öko Test recently issued a warning against home-use IPL tools, stating that using them over skin discolourations and birthmarks could potentially cause cancer. The IPL manual also warns against using them on birthmarks of any kind, which makes it useless for those with lots of body freckles.
  
   Though the Philips Lumea itself is a great little tool (apart from the fact that the built-in lamp makes it a prime example of planned obsolescence), the IPL method gets a thumbs down from me. It doesn't fit with my needs and lifestyle. I find epilating to be more time-efficient and safer, and for long-term results I feel that a good laser treatment would be a better investement. However I would recommend an IPL machine if your hair doesn´t grow very aggressively and you don´t have many birthmarks. Another very strong argument for IPL hair removal is no risk of ingrown hair.

   Do you use or have you tried the IPL hair removal method, and if yes does it work for you?


Check these out: